(EDIT: I finally figured out how to use ArtStation's marketplace lol. The link has been re-added below. You can also find more info below that can help you in Procreate.)
So.
I recently made a short story using only Procreate (strictly drawing) for the first time ever and it was an....interesting experience coming from Clip Studio Paint.
In Clip, I always set up my files to print in case I ever decide to make a physical copy(s), I was a little bumbed that Procreate didn’t have any print guides. So, I decided to make one for my project in case I ever decide to print it, and then I decided to share what made with others in case anyone was having a hard time and would also like to print their work.
Here are the links to Gumroad and ArtStation, plus more info about the kit:
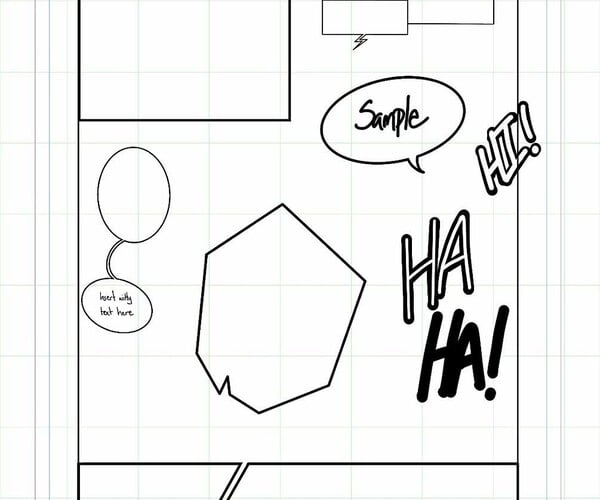
“A basic comic kit I made for Procreate for myself while working on a project, and I decided I’d share. The kit includes a 300dpi 8.5x11in Procreate document with:
- Print Marks for 7x10in prints
- 1” Grid Marks w/ in-app .1” grid (resulting in 10 divisions)
- One starter rectangle panel to customize
Kit also includes:
- A comic pen for creating panels, balloons, etc.
- Two PNG Print Mark files (one with dimensions labelled + one w/out)
Procreate wasn’t designed to be a comic-centric drawing app, but with these small tools I hope it’ll make comic making a little easier for others.”
Hope this helps someone’s work flow a little bit 
P.S. The kit is available for free, but consider tipping as well to show support. Also, let me know if there are other print sizes that could be useful.
Happy creating 
ADDTIONAL CONTENT+ TIPS ON HOW TO USE FILES
I have uploaded five additional page layouts in a separate version on Gumroad and ArtStation that is available for purchase (More info on them can be found through the link. And don't worry, the original files are still free to download )
And to clear up any possible confusion, I’d like to share how I have used these tools (quoting my replies below):
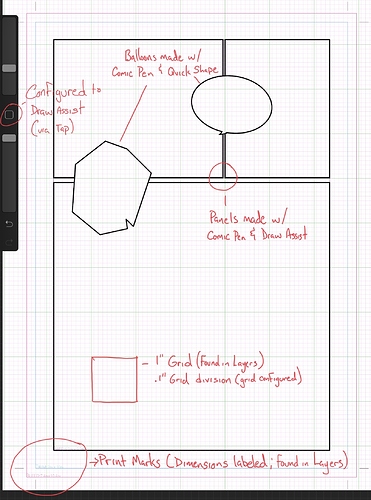
unfortunately, there are no vector tools in Procreate like Clip, so you have to make everything manually. There is a starting panel within the ‘safe zone’ in the Procreate file that you can use as a jumping off point to make your own panels with the help of Drawing Assist. I added a comic pen brush I made to help make uniform panels and balloons.
(With Drawing Assist and the ‘comic pen’, I was able to make consistent panels without worrying about pressure sensitivity. The same goes for word balloons with the help of Quick Shape.)
For reference, the comic pen is similar to the Monoline brush found in the Calligraphy section, but just a little smaller.
The other PNG files are just the Print Marks you can import in Procreate (they are 8.5x11in though, so it’s best to keep the dimensions if you plan to print your stuff).
As shown in the above image, I configured the Square to toggle Drawing Assist via tap. I used this a lot while working on my short story.
Additionally, I made a lot of used with Procreate’s Quick Menu. Here is how mine is setup
The Quick Menu is set to appear by a finger touch, so it’s very easy to swipe in the direction of which action I’d like to initiate.
You can find all these options in Gesture Controls under Preferences in the app
CANVAS STATS
For anyone who is interested in the canvas statistics or time lapse video, there is already information from working in the 7x10 Template file (and the page layout files).
I, unfortunately, can’t reset the canvas statistics, but I recently updated the 7x10 Template file on Gumroad, remaking it in a brand new file to start fresh, so you may want to redownload if you have previously. All procreate files’ time lapse have been purged as well, so you can start your videos fresh.