1 / 37
Nov 2020

Let's help each other work faster.

My list is fairly short so far:

  • Work in batches of 3-5 pages
  • Prefab the shit out of everything from page layouts to speech bubbles shapes and characters design elements
  • Do backgrounds in 3d, then just render 'em out (also can be called prefabing)
  • Can't do 3d? Utilize this method41, then!
  • Use apps like Lazy Nezumi Pro to make lining significantly easier and faster.
  • created

    Nov '20
  • last reply

    Nov '20
  • 36

    replies

  • 3.3k

    views

  • 27

    users

  • 97

    likes

  • 3

    links

None at all! I’m an idiot! 🤣:see_no_evil:

Lol! Actually I do copy and paste backgrounds from previous panels occasionally.

I follow a creator here who uses 3D figures/people to work out their scenes too.

I think making things in 3D first would actually take me even longer. Lol.

Help!

Compared to drawing same thing just once? Definitely! But if you need to draw that thing for thirty or fifty comic panels consistently and it's fairly detailed? It adds up substantially.

I got better basically. I try to have things prepped in advanced but really everytime I improve I use that extra time to make my work better so the amount of time it takes stays pretty steady. I do backgrounds by hand because I'm not personally a fan of the 3d backgrounds. backgrounds still tend to take a while for me but I'm working on improving in that area.

I keep a panel template folder that include all the layers, lighting effects and subfolders I normally use. Draw on the lineart layers, fill the colors on the color layers (hair is separate) according to the character, drop in the background and do shading. Rebalance everything with correction layers then on to the next panel.

Keeping lineart clean enough that coloring is just a quick fill helps a lot and so does keeping character references in the sub view so their colors can be grabbed quickly (doesn't hurt to have their picture for drawing reference too!).

Completely rearranged Clip Studio interface so there isn't junk cluttering my workspace.

We never plan to use 3d for characters because I'm already at risk for drawing characters that look too static and I think rule of cool > perfect anatomy anyway. Plus after enough practice I think it's faster to draw directly rather than model then draw. But I think for our next project I'm going to use 3D models as references for backgrounds :thinking:. If you're doing LOTS of content in one place, I think it's worth investing the time.

Learn your software inside and out. If you can be arsed to spend hours and hours drawing a comic, you can be arsed to make it faster and easier for yourself.

^This, honestly. I'd be 90% slower without my keyboard shortcuts...

Also, I don't know how useful this is for digital painters but MASK MASK MASK MASK MASK

Masking techniques are ways to get things done through elimination...for example, instead of painstakingly tracing over a character outline to make a silhouette, try (1) make new layer on top, (2) fill entire layer with color, (3) select everything EXCEPT character on original layer, and then (4) move back to top layer and delete selection. Bam: you now have a perfect silhouette in just a couple clicks, rather than 15-30 mins.

Every single time I learn/devise a new masking technique, it speeds up my work substantially. The latest one I figured out is a similar one using the recolor tool to do flats...my outlines are always full of holes, and I've found that throwing on big splotches of color and erasing along the lines where they spill over is faster than zooming in and trying to fill in all the holes before I even get started. And keep in mind, this technique would not work without the keyboard shortcuts I can abuse to rapidly switch colors/tools~

Don't forget clipping layers - you actually don't even have to go back and select if you do that ;D. And that way, if you change the layer underneath, the mask automatically applies to the layers above. I got tired of re-masking and was so excited when I found out you can do this!

For the flat colors, i just use the wand tool in Photoshop. Then select and expand the selection 1 pix.

I don't do shortcuts, it takes too much time to learn the new information and figure out how to apply it.

Especially for 3d backgrounds. None of them work with my line style so I have to do everything from scratch every time.
Any shortcuts like that I have attempted in the past I had to redraw anyways xD

I'm a grinder. Have to do it the hard way, which at this point is faster than any shortcuts I could learn.

I really gotta learn how to use layer masks :joy: Tbh I still have no idea what do they do, or what are they even for.

Anyway, I guess I have two techniques that may or may not be common knowledge? I developed them still back in the days of mouse coloring, and tbh use them to this day - there might be some people who find them useful.

  1. The easiest way to cleanly fill in the base when you have a sketchy/messy lineart (for example a scanned/photographed pencil drawing), and the magic wand tool fails you... is definitely not painstakingly filling in the base by hand. :joy:
    Just trace the outline with the vector curve tool. (My software is Paint Tool SAI, but other programs probably have some equivalent of it.) Then you just select the inside of your outline and increase the selection size a little, and you have a clean, hole-free base! It will still take time, but trust me, it is much faster than filling in by hand, particularly if you don't have a tablet.

  2. Always do your base colors in layers, and think through the order carefully so you never have to color around the same part twice. For example, I usually put hair at the top, so I can just color the lower layers with a large brush without worrying about the details.
    These days I tend to merge the base folder once the base colors are done, though.

  • Recycle panels whenever possible, even if it's just a base sketch.
  • Have transparent .png images for complicated details like Adrian's tattoo or those police badge thingies that go on jackets, so I can just copy-paste them instead of having to redraw them again and again and again XD
  • Sims custom poses & sceneries as references ftw :smiley:
  • If I'm feeling lazy when coloring with Procreate, duplicate the lineart layer and then just drag and drop colors to fill the flats. I don't do it very often 'cos I actually like coloring flats by hand (I find it kinda relaxing, lol), but if I want to speed things up, that's an option.
  • All character flats on one layer, all shadows on one layer. I was never one to use a whole lot of layers anyway, and reducing the numbers of layers helps me avoid confusion anyway.

Turning a layer into a reference layer on procreate in order to instantly fill line-less shapes that match the line art on the layer below has proved to be super useful. This is great for making silhouettes or for making backgrounds that have multiple textures.

BRUSHES OMG i just made a bunch of csp brushes and bgs are so much easier now what have i been doing???

also 3d models for things i can draw bc fuck it.

also also overlay layers for shading so i dont have to shade every piece by hand are a godsend....or just not shading when light isnt playing into storytelling.

gradient. maps. seriosuly i have brushes that are in black and white i just slap gradient maps over.

also using the same pieces for similar panels and tweaking them a little.

I've learnt a few hacks for speeding up my work ^^

  • When doing your backgrounds, start from the full view of the BG (e.g. below) Colour in the base colours (skip if it's 3D rendering)

Zoom in and blur the BG as you include your characters in them! Zoom out and repeat process for several panels! I tend to create at least 2-3 angles of a certain area so it isn't too repetitive.

  • For CSP users: AUTO ACTION! AUTO ACTION! AUTO ACTION! Search the tags in the asset market and download as many relevant auto actions as you want! They've helped me out a ton!

  • In all honesty, the best hack I've used is to use bucket fill for colouring :joy: For illustration art or if I'm doing cover art, I colour the base in desaturated peach and colour above them. This is for when I have more time on my hands. (Example below isn't my art but it's a similar trick to what I use! I might try doing this in one of my episodes actually!

  • And finally, learn atmospheric lighting! It completes your picture and cuts down the time in shading and highlighting your characters!

Some of the main ones that come to mind that I've picked up before starting comics in earnest a few years ago and now:

  • Switching to full digital. I started out making webcomics with traditional line art and... I can't emphasize enough how much extra time that added onto the whole process for each page. From having to fully erase and redraw elements that were off or needed to be resized or rotated slightly, to having to use a light box to trace repeat panels or backgrounds, to erasing out the pencils (or using other tools to do so) to scanning (each sheet 4 times because of the paper size). Working in full digital has been a huge all around time saver.

  • I've seen mentioned above, but something that I just recently discovered and started to use was layer masks for various things. Flats, shading, backgrounds... everything. I'm sure I'm not using them to full effect yet but just the sheer amount of clean up work that they remove is insane.

  • using the lasso tool more liberally. For coloring in flats, for shading complicated areas/shape over laps, quickly defining texture areas, etc.

  • Another one I saw mentioned above: custom brushes. I admittedly don't have too many yet... but I just recently learned how to make brushes out of patterns/shapes and can tell that has potentially useful applications as I try it out more. For now I made one to easily paint freckles on one of my characters tho.

  • Paths are another thing I've just recently discovered and started using. Especially since I use a custom slightly textured brush for inking, this allows me to quickly and easily stroke my panel borders, speech bubbles, store paths of characters to lay down a base for the flats and sometimes add a thick outline, etc. I've set up custom actions to quickly save selections as different types of path (panel, speech bubble, or character) and label them accordingly and then they become a useful too for saving and modifying selections easily.

  • Speaking of... actions in general. Another thing that I'm sure I'm not using to full capacity, but I only first learned what they were a year or so ago and I've made a few useful ones. The aforementioned path saving ones, one that sets up all of the typical layers and guidelines in a new file, etc.

  • Being faster to identify when I need or should be using a reference and bringing that into the sketching process earlier. Despite knowing that references are good I've often been reluctant to actually go seek them out unless I get really stuck on drawing a certain thing. I've been trying to get useful to pulling in references frequently even on things I'm confident I could "fake" well enough to increase the speed and quality of atypical things that I draw.

Well, for regular layers it's just what it sounds like, a mask to make sure that you would never' say' overpaint something you don't want to. But for me the greatest usage is using it with flat shading colors - I color on the b\w mask directly, and can instantly switch between drawing and erasing by simply pressing X to switch black and white. So much more convenient that jumping between two tools with the different settings.

I JUST learned it recently;

In Krita, the magic wand tool's range can be expanded. So now I have a faster way to colour and shade, being able to do it in a few minutes rather than half an hour.

I am so excited cause it means I can make stuff faster now!

  1. Everyone has a different pipeline (which is the steps it takes to make a page) so once you have a style that works and a pipeline you are happy with, STICK TO IT, otherwise you'll be reinventing the wheel each and every page and it takes forever.
  2. Because you have a pipeline, if you noticed that there's a part of the process that you absolutely hate, if it feels like paperwork--find a way to get a program to do it for you, or turn that sucker into an action. I do my color flatting with a program and I make really intense actions that I outlined out here. Like--it has already saved me hours and hours of the current project I'm currently making.


3. When you are making your linework, try to do things in long, graceful lines, do not go back and do tiny strokes--long, graceful, beautiful lines. Redoing the same line over and over is a pain in the ass and takes forever. See-through brushes and tiny brushes also take longer to color so I love em for illustration, I don't use em for comics anymore.
4. Make photo reference for hands. It's always faster than thinking you remember hands. You don't.
5. You don't need a background in every panel--in fact you only need it like once a page. In long-form comics, you need it even less. Occasionally add that spread shot for the wow factor, and then go back to doing plain panels for the rest with the occasional background element. Details kind of slow down your reader, it makes things feel dense--you most likely won't need them.
6. zoom in if you can get away with it. Not all the time, but if you can crop out the excess and edit your pages to less panels, less dialogue, less...STUFF, that's probably the right choice.
7. Brushes that are stamps are hella helpful--stamps of leaves, stamps of grass, stamps of trees and etc. These are in both Clip and Photoshop and are just great. If it looks too much like you pulled assets out of your butt, put a blur on it with an adjustment layer and that usually helps.
8. I don't use 3d bgs because I don't need to, but I do use guides for perspective, they are wonderful.
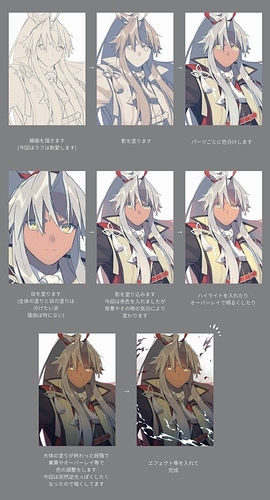
9. Don't skip making thumbnails for your layouts and your color studies. It saves so much time and you won't end up with cramming text into space it can't fit into.

Oh yes, too much BG can make reading fell sluggish. This gives me a better solution for one of my panel. Thanks! :slight_smile:

Well so far:
- customize your keyboard shortcuts -- I customized the keyboard shortcut for the tools wherein all the keys will be near my left hand, while I draw using the right hand (if you're right handed just reverse it P.S. I'm Ambidextrous btw)
-separate your color layer and line art/ make a copy for your lineart - trust me, if ever you screwed up, you don't have to redo the damn thing all over again
- name your layers not necessarily all but at least the important ones --- it will prevent you not to paint/fill the wrong layer and easier to change the colors if ever you decided to
- if you're using the wand tool: pressing Ctrl, while selecting the areas that will have the same colors
- using clipping mask