1 / 5
Jul 2018

Hi guys! I'm a long-time on-and-off lurker who is finally posting my webcomic, Imaginarium23, after working on it since the beginning of the year. It's been a fun and challenging journey, and I'm still figuring out my workflow and how to be as efficient as possible!

I work in Clip Studio, and since it doesn't have an automatic slicer I went in search of one...kept hearing about how amazing ImageMagick is, but couldn't find any step-by-step "ImageMagick for Idiots" guides!

(Although this thread39 was super helpful, and this thread47 links to an awesome web-based slicer!)

So, while most of you probably have this figured out already, I hope it'll be helpful if there's anyone (like me!) searching for simple, step-by-step instructions on slicing images with ImageMagick.

I save my episodes in three or four 800px X 20480px images--this slices up into 16 800px X 1280px images.
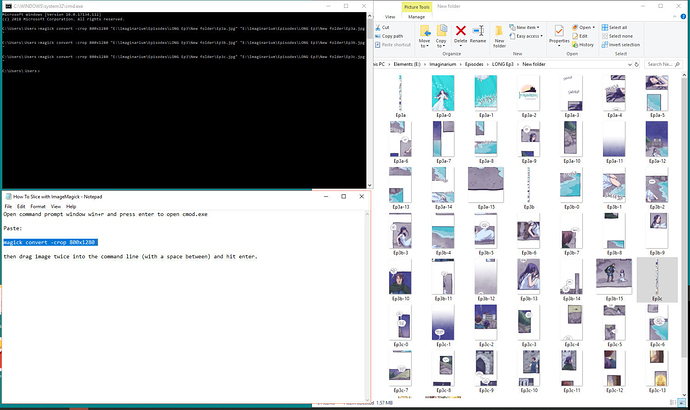
In my webcomic folder I keep a .txt file with these instructions ('cause I'm forgetful about stuff like this, haha!):


Open command prompt [window win+r] and press enter to open cmod.exe

Paste:

magick convert -crop 800x1280

then drag image twice into the command line (with a space between) and hit enter.


This way I can just grab that line and paste it in the prompt, drag the image into the command, and I don't have to think about typing in the file location or anything. I hope this is helpful for anyone confused by ImageMagick!

Here is a screenshot of the different windows side-by-side as I slice up an episode:

  • created

    Jul '18
  • last reply

    Aug '18
  • 4

    replies

  • 3.8k

    views

  • 4

    users

  • 4

    likes

  • 7

    links

Just to clarify if anyone was confused by my previous command of:
magick convert .\filename.png -crop 800x1280 -quality 100% -scene 0 .\foldername\out-%d.jpg

it's essentially the same command except I added things that made my life convenient. rather than drag and drop stuff, I just always have one command I copy paste and adjust filenames for...

-adding the file names allowed me to convert from a PNG to a JPG (everytime you do something to a JPG it drops in quality, so slicing is the last thing I do, and therefore I hopefully have the least amount of quality drop before I update)
-Adding "-quality 100%" prevents a quality drop(aside from the usual drop of converting to JPG)
-Adding "-scene 0" allows me to have a starting point for the number in the file names.... I found this helpful if I later wanted to add some promo I could ensure the promo came numerically after the other stuff.
-and the extra "foldername" at the end allows me put the images in a specific folder for my own personal organization.

There are even more commands you can add, like a flatten command if you want your tiff or PSD files to merge layers before slicing. Image Magick really is an amazing tool.

Just a question. Does it works in mobile browser? I'm currently looking for one that can works well on mobile because I don't have a pc or the leisure to use one.

14 days later

Well, I have no idea how to use the first webpage XD . For croppy, I was only able to use the older version on chrome (idk why but I can't do it in other browsers) because for some reason I can't find the 'process' (or whatever it called) in the new site. Unfortunately, the one I needed have a different pixel measure from webtoon and tapas, so I can't use them. ;v;

Btw, knicknic beta husband-san, thank you for making the website, you're awesome :wink: