I work traditional, so here's my routine:
Preparation 1: Before I start a chapter, I make sure I have at least a loose script/plot figured out. I tried having a detailed, fully-written script for chapter one, and ended up abandoning the verbatim version less than halfway through and ended up drawing each scene page-by-page however it needed in order to flow, following the basic structure of the plot and hitting the important points, but not really worrying about the exact dialogue or shots that I had initially worked out.
Preparation 2: Before I start a new scene, I make sure I have designs for any significant characters, places, objects, or effects so that I don't have to make it up on the fly. I keep these designs in a separate sketchbook, including color swatches, and detail shots of any costume items (like rings, tattoos, etc) in case I need to draw them close up.
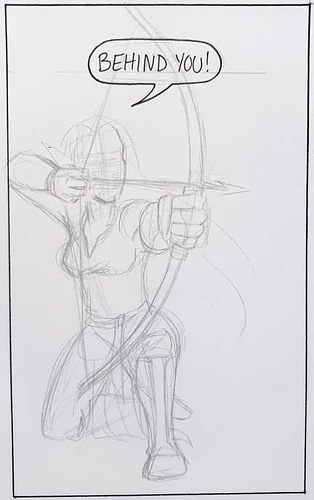
Preparation 3: A day or two before I start drawing a page, I thumbnail it in my sketchbook, working out the basic layout of the panels, where the characters go, where the speech/word bubbles go, etc. This is very, VERY rough, usually. I write the dialogue for each word bubble in the margins, keeping in mind how long a snip of dialogue can be in the panel space I gave it.
Drawing 1: Actual page work. I do this on an 11x17 inch sheet of Bristol board (ask me exactly which kind! I'm very specific about my paper!!), taped to a wooden drawing board. This step involves drawing margins, laying out the panel borders, roughing in where the characters go, drawing in the word bubbles, and inking the border margins and word bubbles, including hand-written text. I do NOT do any actual detailed drawing at this step. This step takes me, on average, an hour and a half, and I usually start this step on days when I don't have a lot of free time to knuckle down and just DRAW for hours at a time. A good step to do on errand/chore days, or work days.
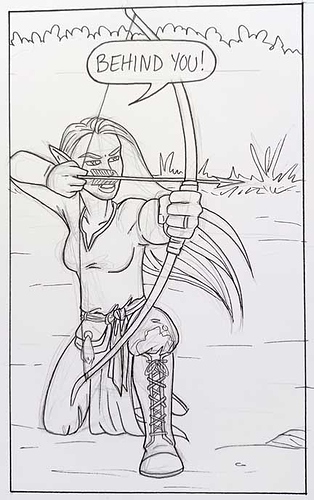
Drawing 2: Finished pencil work. I sit down and draw in all of the detailed, finished pencil work. I may leave out small incidental details like precise brick placement, or foliage textures or the like, which can be done on a different step, but I don't half-ass things like faces, poses, hands, or perspective, because I CANNOT fix/adjust/fake these things later. I do this step on a day when I don't have a lot of responsibilities, because sitting down and just drawing a whole page to a high level of detail can take 2-3 hours in a go.
Inking 1: After letting the pencil work sit for a day (so I can more easily see any errors that need fixed), I ink my pencil work with a series of Micron ink pens. I then let the ink lines sit for a while, usually overnight, so I can be DEAD CERTAIN they're dry. This process usually takes me about an hour to an hour and a half, so this is another good step for days when I don't have a lot of free time, or a lot of mental energy. Once I'm ready to color, I'll erase my ink lines.
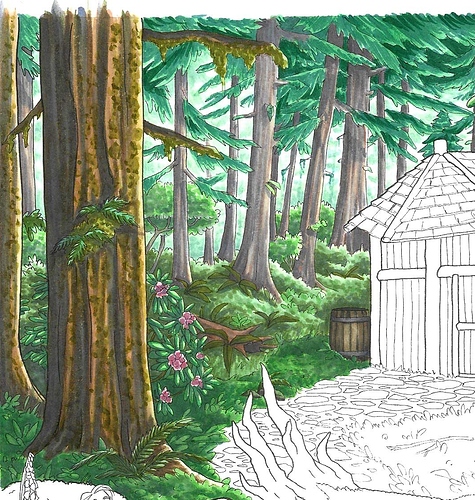
Coloring 1: I color with markers, and given that I fully render my images, coloring takes me a LONG time. It is far and away my most time-consuming step. As such, it's usually spread over several days, taking on average 2-4 hours a day. I often start with the lighter colors in the image, such as pale skin tones, light-colored clothing, blonde hair, etc. Doing skin tones alone usually takes a day, because my process for most skin tones involves an AVERAGE of 5 layers of color. Sometimes more if I'm doing wild lighting.
Coloring 2: Once I've gotten my delicate color areas handled, I turn my attention to the background elements, clothing, and dark areas, like dark hair, deep shadows, etc. Sometimes this results in whole areas being fully rendered while other areas haven't even been begun, which can be fun to look at.
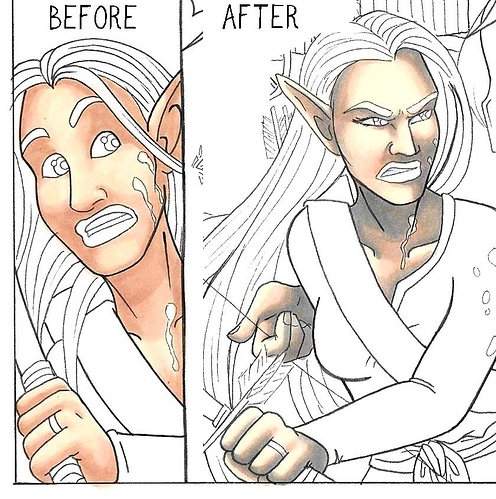
Inking 2: What? Haven't you already inked, Scarlet_Cryptid? Yeah. Yeah I did. But as much as I hate this step, I've noticed it makes a big difference in my finished product. Once I'm done coloring, I RE-INK my linework. This helps me conceal any minor errors I made with the markers, re-emphasize lines that were partially lost during the coloring process, and darken my linework. It just... makes everything look cleaner and more finished. This is another step that takes, on average, about an hour and a half. This is also when I fill in my panel gutters with black ink, because even though I'm scanning these and cleaning them up in Photoshop, I still want the actual, physical finished pages to look nice, too.
Digital Finishing: At this point, I need to scan my page. While I'd LOVE to have a scanner big enough to fit a whole page at once, I have never found one (at least not available for home use), so I have to scan my page in 3 sections and piece it together in Photoshop. I make sure to clean my scanner AND my page before I scan, so I spend a minimum of my time cleaning up errant spots on the finished scan. I piece the separate scans together, adjust the levels and color saturation/balance, clean up any spots or fuzz on the scans, or any errors I made in drawing/coloring, digitally blacken the panel gutters, put the text in, and save the whole thing in various formats so it fits the demands of each platform I post on. I also have a master copy at high resolution if I need/want to print it later or something. This whole process takes anywhere from 30 minutes to an hour per page, depending on how much trouble it gives me.
After all that? Every Friday I schedule my pages to drop at noon (Pacific time) on Saturdays, and then I start planning out the next page. This process takes me about a week, which for the moment is comfortable and sustainable for me.