1 / 12
Apr 2022

A comic isn't all about looks... but it sure helps to have a pleasing and easy to read page, so here are some tips!

Write yours below!

Note: These are subjective tips based on how I make my comic! You do not have to follow any of these if they don't work for you.

1. Colour Schemes!!- I try stick to a few key colours. I usually have a couple neutrals, a general colour and an accent colour

EXAMPLES:
I mainly stick to a red, black, grey and slightly orange colour scheme for my first scene. The red really makes my villain character stand out, so I take into account that he will usually be the focal point of the scene. I also use red in my background to highlight specific panels.

Meanwhile chapter 2 has a very blue, purple and red colour scheme! I use a very bright purple and red to contrast against my more dull colour choices

That also being said- you can plan your colour schemes around your character's designs. If the characters are say going to a new location, you can plan their outfits accordingly to have it fit (or stand out!) against the environment. For the pages above, the character's outfits stick to cool tones for this reason.

2)Plan your composition!

When laying out your panels and speech bubbles, make sure it is easily readable. If you're making a western comic, this means people will be reading from left to right, so keep this in mind!

Your eye can be led by a variety of factors other than just speech bubble placement (line, direction of character, perspective, colour...) so make sure to pay attention to where the viewer's eyes are being led.

I've made a bunch of mistakes in this regard, but yeah. It's honestly a learning process.

3)Include a variety of shots!

If you only include 3/4 headshots with no background present your pages are going to look monotonous and uninteresting. Try doing half-bodies, full- bodies, angle the camera in different ways! It can also amplify your storytelling (e.g having a character look intimidating by having a shot of them from a low angle)

Also- PLEASE establish locations at least once. It helps your audience familiarise themselves with the area and lets them know the charcaters are somewhere.

4) Sometimes simplicity is key- Having too many details can confuse pages, and your details should be kept to places that are your focal point.

For me, I use 3D models for my backgrounds, but not in every shot. Some panels have a single colour background because the character is the focal point. Having too many backgrounds would honestly distract the viewer. It's really your call on what you want the viewer to focus on

So yeah, those are some of my tips. Don't know how helpful they are but they're here!

Write some below if you have any.

  • created

    Apr '22
  • last reply

    May '22
  • 11

    replies

  • 942

    views

  • 9

    users

  • 57

    likes

  • 6

    links

Oooh, great thread idea! :hype_01:

Okay, so a really common thing I see, often in comics with well-drawn art, that immediately creates an amateurish look is when it looks like this:

  • Characters are all standing pretty much in the middle of panels.
  • The characters are all standing straight-on to the viewpoint
  • The distance of the viewpoint from the characters is nearly always the same so characters are always the same size in the panel, and all characters in a panel are the same size.
  • Characters are never overlapping each other.
  • The viewpoint is always straight-on as if the characters are viewed from roughly their own eye line.
  • Scenery is nearly always drawn with 1-point perspective so all the horisontal lines, like tables etc. are parallel to the panel borders.

My old comics tended to tick a lot of these boxes, and it always bothered me, like "I know something about my work looks amateurish and unappealing somehow... but I can't work out what it is."

It's a matter of thinking about composition and deliberately placing your viewpoint in a place that creates dynamic angles and interesting overlaps. There is still a place for flat composition of course; it has an inherently comedic effect that can be used to advantage! But the trick is to avoid using comedic flat staging accidentally just by not thinking about it.

Here's something I whipped up when training a newbie illustrator at work who kept just plonking characters in the middle of the page standing straight-on and having group shots where everyone was standing in a line an equal distance from the viewpoint.:

And in a comics context, it's good to try to think about panels like this:

Like not every panel needs to be like this, but if you try to regularly place the viewpoint to create:

  • Dynamic diagonal angles and 2 or 3 point perspective (If the only perspective you ever use is 1 point, it will make your work look a bit "high school". Use 3D models and reference if you need to).
  • Variety in how far from the viewpoint characters and objects are placed.
  • Interesting overlaps where characters and objects overlap and break up monotonous lines.
  • Variety in where characters and objects are placed in the frame (ie. not always in the middle, not always with the whole object or character completely in frame).
  • Variety in the height of the viewpoint (this doesn't have to be as dramatic as bird's eye or worm's eye views. Try throwing in just a slight upward or downward angle).

If you can start thinking more deliberately about your viewpoint in panels, instead of placing it where it's easy or where you always place it out of habit, your work will really start to have that air of professional confidence.

** frantically searches for comic pages I've done that actually look good **

Hm, a lot of good points have been made already...maybe I can say something more general...

Doki's Golden Rule: It doesn't hurt to break the rules

If you're saying to yourself, "my comic pages look so bland and uninspired compared to other people's...what can I do to make them better??"
One general strategy I've found over the years is to take at least one routine you use when doing art, and let it go.

Excessive rule-following will kill your art-- at the very least, it'll box you in, and make sure you're always doing the same things (and always making the same mistakes...). It will prevent you from seizing opportunities to make your art look fantastic when they come up, because you will have trained yourself to ignore them.

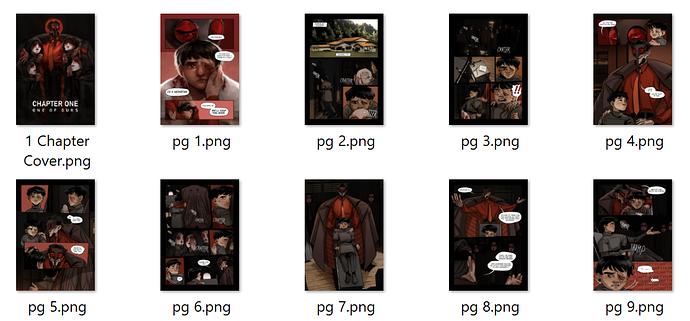
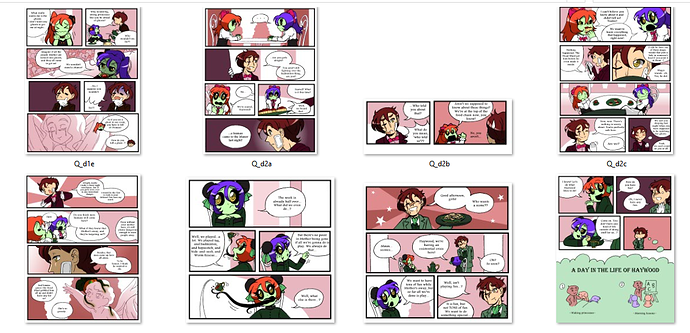
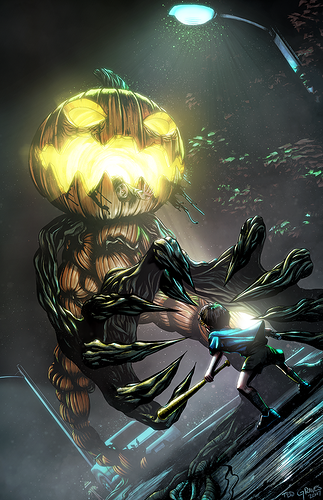
Exhibit A, from DotPQ's first season:

...Passable work, but could be better.
Two panels stand out to me, in terms of immediate visual appeal: the third panel in the top left page (Q_d1e) and the third panel in the page below that one. If the whole comic looked like those, I could've been a lot prouder of it, I think. ^^ And I knew those panels looked particularly good when I drew them.

But I ignored what they had, because they broke the 'rules': Rule 1, minimal shading on characters; Rule 2, no gradients in backgrounds; Rule 3, as few colors as possible in backgrounds...rules followed by most of the panels, as you can see.

These rules were designed to make the comic easy and quick to produce, but I think they actually did the opposite, because they played so hard against my strengths, it was a struggle to get the panels to look even this decent. I spent hours obsessing over them in an effort to make the rules work, instead of just making the art work.

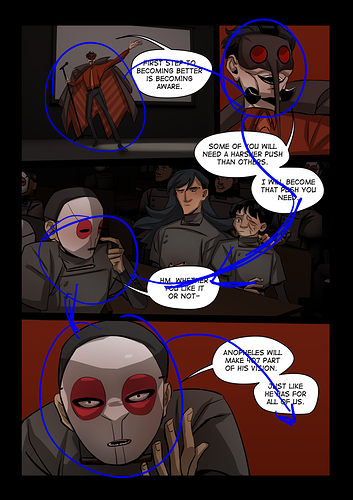
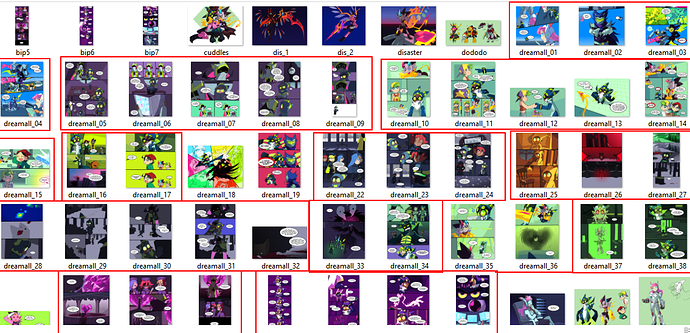
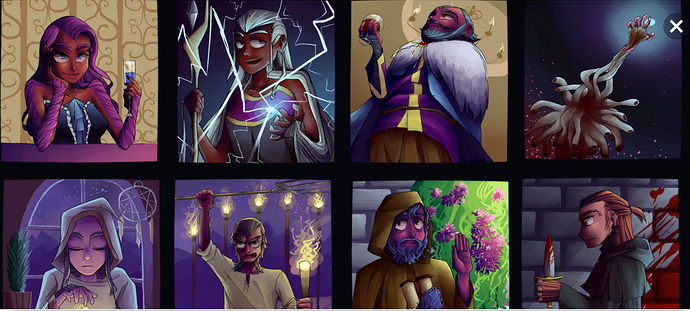
And now Exhibit B, from the 2nd season:

There are really too many changes to list; everyone's bound to improve in 3 years. But I hope you'll at least notice that I've done away with the old rules, including one rule in particular that I think held my work back a lot: the limited color palette.

I LOVE colors. ^^ But until recently, I never let myself explore and play with them (thanks to the Rules), so I never thought I could be particularly good at using them.

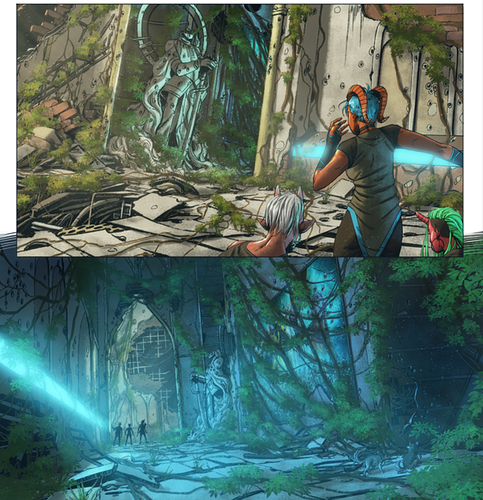
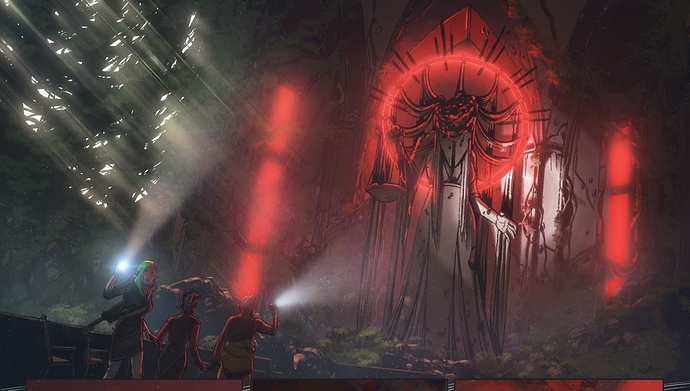
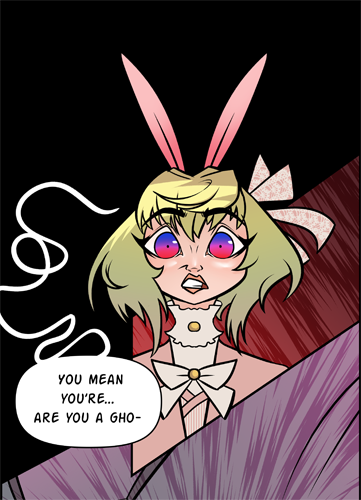
But lo and behold, Exhibit C (a fancomic):

Really, this is just the beginning of my journey in learning to truly emphasize color in my comic work. But it's already a big step up from what I was doing before-- in this case, you can even separate most of the story beats by color, as shown by the red lines.

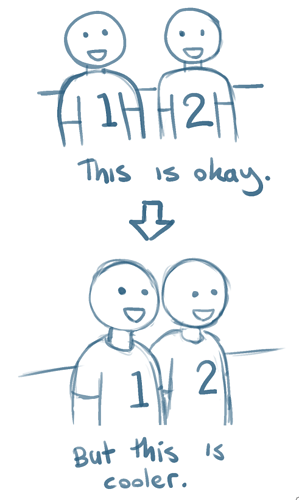
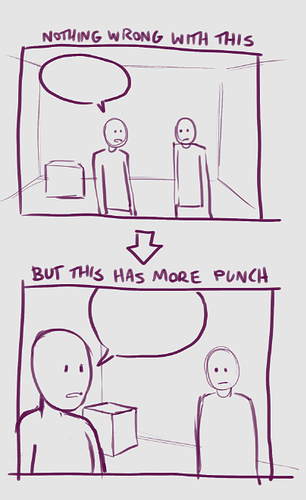
But what's best about this new style is that it's flexible: if I do something well in a certain panel, I don't ignore it; I learn from it. If it doesn't work in a different context, I change it-- even if that means making some kind of change in every single panel. My main goal isn't to follow rules anymore; it's to play to my strengths and make the art look fantastic...because if you do that, you'll naturally end up with an appealing comic. Maybe it won't be perfect, but it will at least be filled with things that make you proud.

And this can take a lot of different forms depending on the artist: maybe you force yourself to use too many colors, and breaking that rule will entail limiting your palette to something that's easier to work with. Maybe you force a ton of character expression into every panel, and breaking that rule will entail letting some panels be subtle, to introduce balance and a sense of gravity.
Maybe you focus on constructing backgrounds when your true strength is in characters and dialogue, or maybe you focus on faces when your true strength is in using the setting to evoke emotions...only you can determine the rule you need to break.

The point is, you probably have a lot more skill and talent than you realize...you just need to give yourself a chance to actually use it. ^^;

Those "death by medium shot" comics are the norm. The main thing is look at what you are trying to tell in the story, then think of a movie. Overhead shots, worms eye shots, over the shoulder shots: these are the norm. Most movies never have two people talking in medium shots. You also can mix it up. In a cafe scene, as they are talking, a shot of the hands of a character pouring coffee. Anything to break up the talking heads
Another thing in almost no full shots in a movie but is in a lot of comics. full body shots just standing there. Action scene is another story, but just a full body shot of a guy walking into a room never happens.
Study storyboard and film making and it will help you make more interesting comics.

Here are a few of the more important things I've learned over the past couple years.

Distinguish locations by color

As the story moves your characters from one location to another, it's important for the reader to be able to track the difference in environments. Changing a scene's color grading is an easy way to communicate this. Here's an example from Heaven Hunters issue 1:

Everything inside the hotel room has a bright warm tint to it, while everything outside the hotel has a contrasting cool tint. This is maintained even when both environments are in the same shot. This is particularly useful when the camera is switching back and forth between the two locations, and you can tell instantly where a shot is placed, even if a shot doesn't have a background. Here's another example from issue 6:

This leads to my next point:

Lighting is everything

Atmosphere is HUGE, and lighting plays a key role in that. As they move from the first to second panel they're moving deeper into the ruins, which is emotionally unsettling, so to sell that the lighting gets darker and the light source gets smaller and lower. As they go deeper on later pages, the environment gets even darker, and they switch to flashlights. Future scenes are bathed in a blood red light as they move to a new area. This helps build an atmosphere that accents the tone of the writing. Establishing lighting based on real lights in your scene is important, and maintaining the locations of those lights as your characters and camera move around can help your readers keep track of where everything is in 3D space.

The reader needs to see what the character sees
When I first started drawing comics it was tricky to know when to omit the background in a panel. These days I've got some guidelines for that. Draw the environment when the characters are aware of it. If the focus of a panel includes something in the environment, for example moving from one area to another, that needs to be drawn in. Don't shortcut past it because it's hard, if you put the work in, your readers will notice!

Establish silhouettes
Silhouettes are a really easy way to pull focus, and tease apart the layers of a shot and establish depth. I use fog a lot for this, but it can be as simple as adding a brightness adjustment layer and adding a subtle bright or dark halo around a character to pull them apart from a background. This is a really good way of clarifying shots with very complicated backgrounds and bringing your characters forward to establish focus.

Tip I would leave is to make your drawing space larger than how you upload it. this is not only true for traditional illustration (like most comics are drawn at least 150% larger than when they go to print) but also for digital comics, Even if you're like, well I'm using vectors, so it shouldn't matter. Digital brushes are mostly meant to be used in at least 300 dpi, and if you're drawing 940 px at 72 dpi, you're gonna have a grainy piece that doesn't look as good, and you're going to struggle with your brushes to get that clean look that professionals have, even if you're using the same brushes they're using.

Like even though my comic is relatively simple, because I can only spend so much time on it (and I want to finish it at some point in my life). But, I try to make sure it looks clean, and that it looks polished, and part of that clarity and polish comes from the fact I'm drawing these panels at 8.5 inches wide 300 dpi even though it's for phone format. Means that if I have a pixel of hair not colored or if I have details that are of normal size--a lot of the problems vanish upon shrinking, and the normal sized details shrink down so they appear kind of magical.

Another thing is to remember to act. I try to remember that if I can just copy paste the face of my character time and time over, then I must have made a boring scene--they should be moving, acting with their whole body, even when they're looking straight forward.

(I should put in more samples but I'd have to crop the episode and I'm feeling lazy haha, you get what I meant by acting I hope)

Like if my audience didn't really read the bubbles (which like...I think some of them don't, seeing the comments haha) then did they still know what my character was feeling? They would, if the characters are acting, reacting to eachother, and moving around the room you drew for them like an actor would on stage. Like not every comic can go full Tex Avery, but you are a drawn medium, so employ that stretch and squash, move beyond where the body can actually go, and it will make pages come more alive. If your characters are stiff, there could be a thematic reason you drew them stiff, but it can also make it look less professional since most people starting out draw their characters deadpan looking at the camera.

Amazing advice as always :triumph::triumph:! And yeah, I've noticed this sort of thing in a lot of comics (including my own in the past) and varying panels with a variety of different angles, shots, perspective and composition can really improve a comic a ton!

I think some people might be afraid of drawing more complex background which can lead to a lot of up-close character faces- it means they can focus on the character instead but it can really create a monotonous looking page. It's a really hard habit to break out of, but is really is worth it!

This is probably more for more inexperienced comic artists, but one simple thing I eventually learned (that requires no additional skill) is that speech bubbles/font can actually be fairly important as far as the initial impression a reader takes away from a comic. (Some of my earlier comics I used Comic Sans font because I didn't have anything else at the time, which looking back pains me, and sometimes when I've seen Arial or Times New Roman it can be a little distracting.) The first scene from my main project I also hand-drew my speech bubbles and/or used the default ellipse shape in Photoshop. Hand-drawn speech bubbles can look great if they fit the tone of the comic, but this was not the case for my comic; they came out looking noticeably wonky, and I did it mainly because I thought the ellipse shape looked so bad. I could see that professional comics had speech bubbles that looked much better, but didn't realize until I saw a tutorial later that the ovals had rounded sides.

Anyway, I bring this one up because once you have found the right font and have pre-made speech bubbles (clip studio already has some great speech bubble options, but Photoshop you have to do your own), it really takes no time and effort at all, and can make a comic look a lot cleaner and more professional.

.

But anyway, love all these thoughts! Varying shots is definitely so important to keeping a scene feeling visually dynamic and interesting, and I would also add that practicing being deliberate in choosing how to frame shots to serve the story best also is an opportunity to level up how a comic reads. (Whether you want one of the characters to appear intimidated or be intimidating, or one seems bored or unengaged or amused or intense, all those might look different in terms of how to angle the camera on the character's face or how close to the character you are. If you zoom in on a character's face, it may add more emphasis to their expression and emotional state in that moment, whereas you might zoom out and show an overhead shot for longer conversation with nothing emotional happening. If you show two panels in a row with a character in a similar pose and camera angle, it will emphasize slight movements and build drama in a different way from more dramatic closeups.)

Storyboarding may be largely instinctual, but thinking about why a frame has been framed that way can help me catch things that aren't working. Following character's emotional states and what needs visual focus to further the story can be a natural way to mix up camera angles and frames and such.

Variation of shots should be used with restraint imo. Don't switch up every shot of your comic just to change things up; that's kind of like writing a novel and looking for words to use instead of 'said' just to switch things up. Also, if you have some crazy dynamic shot for a mundane scene, it's kind of distracting and it loses its impact if used too often. Use dynamic composition to emphasize the right story beats :]

I feel like what darthmongoose was getting at is using naturalistic composition. Having the camera facing everything head on at a perfect angle makes things look unnatural/artificial. The real world is messy, and making things 'messier' in general makes things feel natural. I think this is a general principle that can be applied to art as a whole; for instance, consider this old drawing of mine:

The hair looks weird because the shading/'strands' are very evenly spaced out, but if you consider a more recent drawing:

There's less of an identifiable pattern to where I add shadow to hair; it's more 'random', so it looks more natural. Similarly, the placement of people and objects in an environment aren't going to be evenly spaced; there will be clumps of overlap of things in front of each other and wide areas of blank space.

This principle can apply to regularly-shaped manmade structures as well; consider the brick walls in the above image in contrast with the following:

In the same way, 'randomizing' the level of detail a little also helps make things look more natural.

So relating this back to camera angles - if you whip out a camera and take a picture, it's probably going to be at a slight angle from any rectangular objects in the shot, which makes for 2-point perspective. (3-point perspective happens if you're angling the camera up or down as well, which I'd argue mostly happens due to a conscious decision and thus not as 'natural' as 2-point perspective). That's why variation in angle and subject placement looks better; not because it's variety, but because it's natural :]

Adding to this, one thing that really helped me spicing up viewpoints and using more creative angles was using 3D models for characters! The great thing about them is that you can easily move the camera around and take a bunch of pics from different angles to figure out which one works best. Saves me A LOT of time (instead of sketching the same panel over and over again trying to figure out the right view, I can just pose characters ONCE, take screens and then pick the one I think works best), saves me from the pain of having to search for stock pictures (since finding the exact pose/angle you need isn't always easy) and makes it far easier to experiment with different things :smiley:

Granted, you'll need to do some adjustments (3D poses don't always look natural and you'll still have to figure out stuff like hair physics and clothing folds), but I think it's a great way to speed up process while simultaneously avoiding all panels looking the same :blush:

It's a tricky thing to describe, but yes, kind of. The trick is to make the composition feel pleasingly natural by thinking very deliberately about it.

The funny thing is that when people just whip out a camera, the photos they take are often not nice dynamic shots with good overlaps and dynamic angles. An untrained person with a camera has a tendency to take a picture of something exactly face-on rather than from the most interesting angle, framed right in the middle of the shot and at a middle distance uncropped, and then without thinking about anything like lens length.
And when people draw, the immediate instinct is the same.

Let's say the thing the artist imagines is "A person standing in front of a wall that has posters on it, holding a sword" (listen, it's morning and my imagination is still warming up, okay :sweat_02:).
The difference between not thinking about the composition and thinking about the composition is:

In the first image, which is what a less experienced artist would probably draw, we have this straight-on, very flat view, and the posters are all kind of evenly spaced around. This is kind of more realistic to how people would put posters on a wall, actually; each in a space and largely perpendicular to the wall, but it doesn't look as pleasing or get across the "grunge aesthetic" of a wall covered in posters we're looking for. The character standing straight on means there's no depth or pleasingly dynamic diagonals thrusting out into space, so the effect is comedic (whether intended or not). There's also a tangent, where by not thinking about where the viewpoint is placed, the edge of the head lines up with the edge of the poster in an awkward way.

In the second image, we've deliberately moved the viewpoint around so that the figure can thrust the sword out into space, creating a more dynamic and dramatic feeling. The hips and the hand and chest can all create nice overlaps at this angle. The posters are now overlapping the figure and they're placed in a way that "feels" more random, but is actually very deliberate (actual randomness never looks as nice as constructed "natural" generation based on the human sense of aesthetics).

Composition is funny because if you do it well, non-artists will not notice it. They won't be able to tell you what's good about the picture, they'll just know it looks good. A lot of people will just think it's a magical talent, but it's actually all about making deliberate choices about where you're placing elements of the scene to make it pleasing and balanced. It's kind of about faking a "natural" look. Personally I think a really good document to read on this (it certainly helped me a lot) is the Artist's Course chapter on composition, available here:
http://thinkinganimation.com/Handouts/StagingAndComposition/Composition-Artists-Course.pdf10

1 month later

closed May 29, '22

This topic was automatically closed 30 days after the last reply. New replies are no longer allowed.